 PL
PL ENG
ENG RUS
RUS UA
UA
Raspberry Pi - PHP application
To run remote control over the internet we have to install the Apache server and PHP. We do that by issuing the following commands in turn:
sudo
apt-get update
sudo apt-get install git-core apache2 php5 libapache2-mod-php5
We can also take the opportunity to update the whole system with:
sudo apt-get upgrade
With this application we will be able to switch individual LEDs of the KaMODLED8 module, or all of them, on and off remotely, set a given colour on the RGB LED of the KaMODRGB module and turn the internet radio on and off. The application also allows the Raspberry Pi to be shut down remotely.
The wiringPi library, installed and used in the articles about GPIO and I2C (the RGB LED), is used for the control.
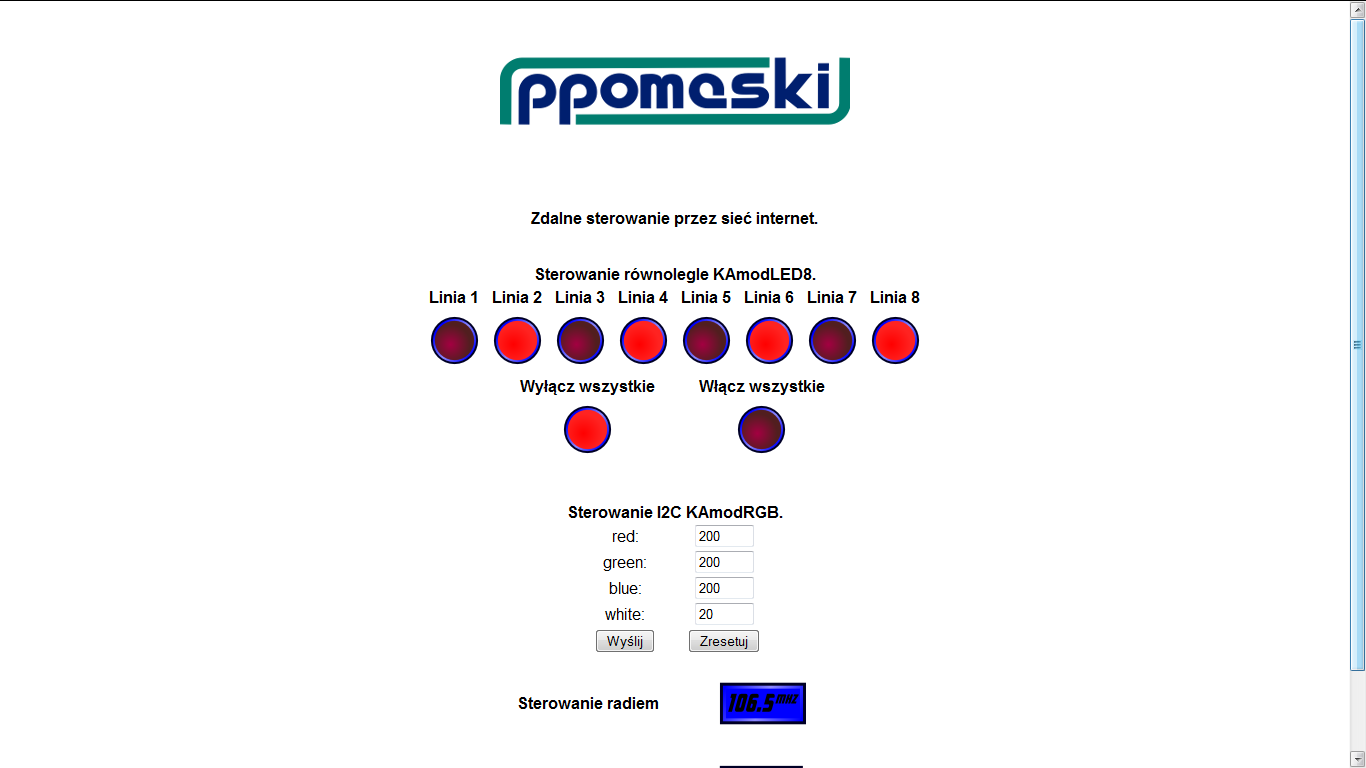
Fig. Control over the web - the browser window.
At the beginning of the file there are the routines initialising the GPIO interface and the NXP PCA9633 chip contained in the KaMODRGB module.
//IO
shell_exec('gpio -g mode 17 out');
shell_exec('gpio -g mode 27 out');
shell_exec('gpio -g mode 4 out');
shell_exec('gpio -g mode 22 out');
shell_exec('gpio -g mode 18 out');
shell_exec('gpio -g mode 23 out');
shell_exec('gpio -g mode 24 out');
shell_exec('gpio -g mode 25 out');
//RGB
shell_exec('sudo i2cset -y 1 0x07 0x00 0x00');
shell_exec('sudo i2cset -y 1 0x07 0x01 0x00');
shell_exec('sudo i2cset -y 1 0x07 0x08 0xff');
Next come the routines reading the current state of the GPIO lines, the contents of the PCA9633 registers and the state of the mpd daemon responsible for the internet radio.
$out1val
= shell_exec('gpio -g read 17');
$out2val = shell_exec('gpio -g read 27');
$out3val = shell_exec('gpio -g read 4');
$out4val = shell_exec('gpio -g read 22');
$out5val = shell_exec('gpio -g read 18');
$out6val = shell_exec('gpio -g read 23');
$out7val = shell_exec('gpio -g read 24');
$out8val = shell_exec('gpio -g read 25');
//Radio
$radioval = shell_exec('mpc | grep playing -c');
$redvalue
= shell_exec('echo $(($(sudo i2cget -y 1 0x07 0x4)))');
$greenvalue = shell_exec('echo $(($(sudo i2cget -y 1 0x07 0x5)))');
$bluevalue = shell_exec('echo $(($(sudo i2cget -y 1 0x07 0x3)))');
$whitevalue = shell_exec('echo $(($(sudo i2cget -y 1 0x07 0x2)))');
Now we come to the functions responsible for interacting with the user, that is clicking the individual lamps. When called, these functions set the state of a single GPIO output line to the opposite value.
if
(isset($_GET['out1']))
{
if ($_GET['out1']) $out1val = 1; else $out1val = 0;
shell_exec('gpio -g write 17 '.$out1val);
}
Next comes the form through which we enter values in the range 0-255 that will be written to the integrated circuit driving the RGB LED. The listing quoted here also contains the part responsible for switching on the individual colours of the RGB LED with single buttons.
<b><br><br>I2C control of the KAmodRGB.<br></b>
<form action="index.php" method="GET">
<table width="200">
<tr><td width="50%">red: </td>
<td width="50%"><input type=text name=redvalue value="<?php print "$redvalue"; ?>" size="5"
maxlength="3"></td></tr>
<tr><td width="50%">green: </td>
<td width="50%"><input type=text name=greenvalue value="<?php print "$greenvalue"; ?>"
size="5" maxlength="3"></td></tr>
<tr><td width="50%">blue: </td>
<td width="50%"><input type=text name=bluevalue value="<?php print "$bluevalue"; ?>" size="5"
maxlength="3"></td></tr>
<tr><td width="50%">white: </td>
<td width="50%"><input type=text name=whitevalue value="<?php print "$whitevalue"; ?>"
size="5" maxlength="3"></td></tr>
<tr><td width="50%"><input type=submit value="Send"></td><td
width="50%"><input type=reset></td></tr>
</table>
<table width="200">
<tr><td width="20%"><input type="button" value="red"
onClick="document.location.href='?redvalue=255&greenvalue=0&bluevalue=0&whitevalue=0';"
/></td>
<td width="20%"><input type="button" value="green"
onClick="document.location.href='?redvalue=0&greenvalue=255&bluevalue=0&whitevalue=0';"
/></td>
<td width="20%"><input type="button" value="blue"
onClick="document.location.href='?redvalue=0&greenvalue=0&bluevalue=255&whitevalue=0';"
/></td>
<td width="20%"><input type="button" value="white"
onClick="document.location.href='?redvalue=0&greenvalue=0&bluevalue=0&whitevalue=255';"
/></td>
<td width="20%"><input type="button" value="black"
onClick="document.location.href='?redvalue=0&greenvalue=0&bluevalue=0&whitevalue=0';"
/></td>
</table>
</form>
This solution has a serious drawback: if we control the Raspberry from two or more end devices (computers, laptops, smartphones), the screen of each device shows the state of the IO lines as it was when the demo web page was loaded. If in the meantime someone changed the state of an IO line from another device, turning an LED on or off, our screen will show outdated information. The same applies to the state of the PCA9633 registers and to the internet radio. To avoid this, the page has to be reloaded from time to time. We can do that automatically by adding a suitable line to the page.
<meta http-equiv="Refresh" content="5; url=index.php" />
It has to be placed in the Head section of our page.
A complete example web page is available as a compressed file in the attachment.
Controlling a device through a browser can be built into the hardware itself - that is how our controller with a built-in HTTP server works. We build such devices to order, together with their software.
Copyright ©2026 systemypomiarowe.pl.